Are you finding the quickest way to install Pro version Prestashop themes produced by Apollotheme or other providers? No more searching, you’re in the right place. Below are the steps you can follow for Pro version Prestashop Theme installation.
I. PURCHASE OF PRO VERSION PRESTASHOP THEMES CREATED BY APOLLOTHEME:
1. Upgrade from Free Prestashop Themes to Pro version Prestashop Themes:
– For those wanting to upgrade to pro version Prestashop themes after using our free Prestashop themes, you can purchase the pro version themes under the guidance here: https://apollotheme.com/buy-theme-apollotheme-com.html
– There’s no worry about losing your customizations upon upgrading. Please send your website information to our email: apollotheme@gmail.com for our support in transferring from free version to pro version.
2. First time Purchase of Pro version Prestashop Themes:
– It is necessary to sign up, log in our website at apollotheme.com.
– see the guidance on pro version theme purchase at: https://apollotheme.com/buy-theme-apollotheme-com.html
– Types of payment with different prices for the pro version themes you want:
+ US$69 single package
+ US$99 single + installation package
+ US$140 developer package
(or for more benefits, you can use Apollotheme’s Prestashop Membership. See more here.)
II. DOWNLOADING PRO VERSION PRESTASHOP THEMES BY APOLLOTHEME:
– There’re two (02) options for you to download the pro version Prestashop themes from Apollotheme:
1. Option 1:
Step 1: Log in Apollotheme’s website: apollotheme.com
Step 2: Click on “Download” section for theme download.
Step 3: You’ll receive the four-file package from Apollotheme, including:
+ Theme: applicable in case of available data and Prestashop website.
+ Quickstart: applicable in case of unavailable data and Prestashop website, 100% demo-based installation.
+ PSD
+ Guide
2. Option 2:
After complete payment, Apollotheme will send the download links for Theme, Quickstart, PSD, and Guide as mentioned above to your email.
III. PRO VERSION PRESTASHOP THEME PACKAGE INSTALLATION:

Here are the methods to install Pro version Prestashop Themes by Apollotheme you can choose from:
1. Installing Theme file:
a. Installing Prestashop theme via Prestashop 1.6 back office:

Step 1: Log into your Prestashop 1.6 back office.
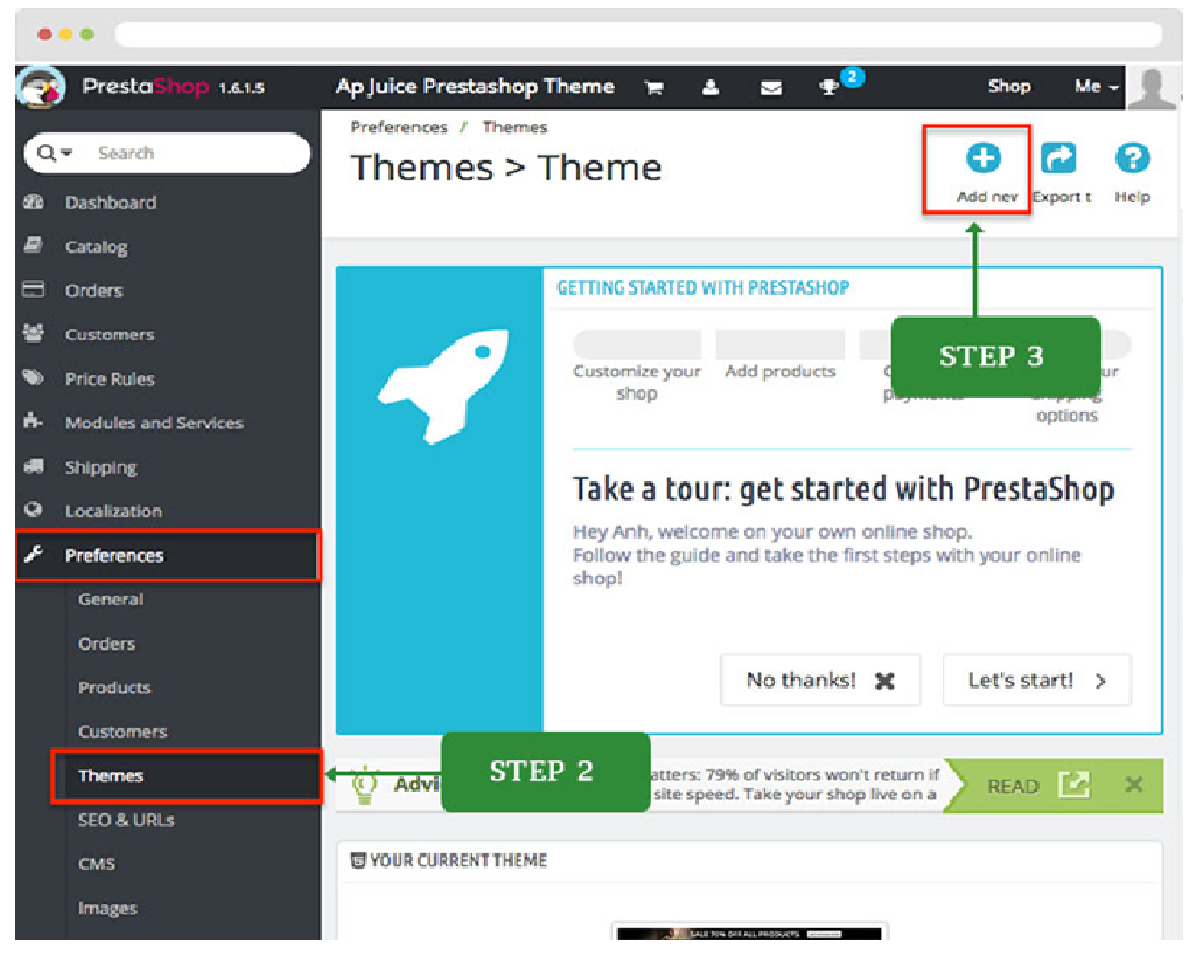
Step 2: On the left side menu, choose Preferences > Themes
Step 3: Click on Add New Theme button.

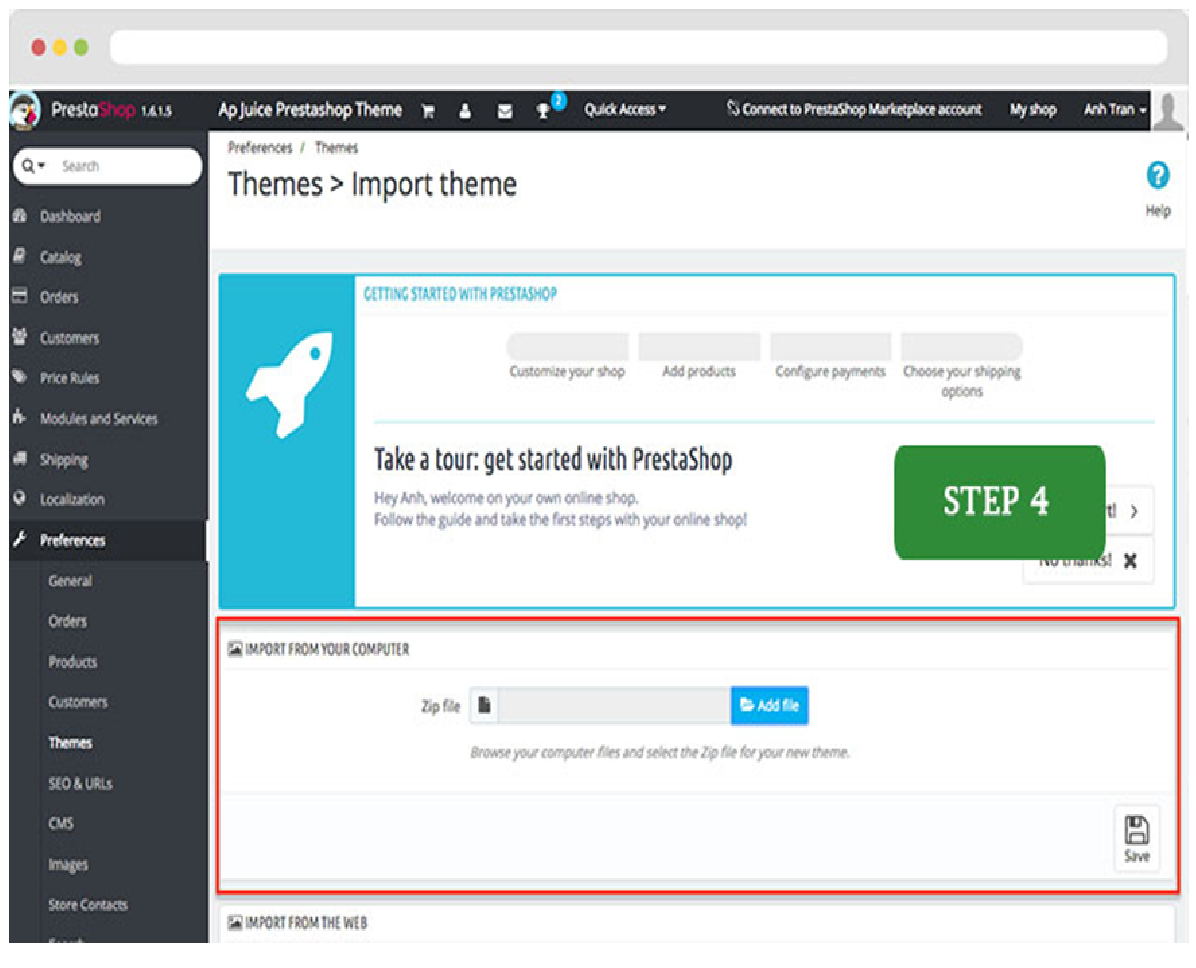
Step 4: At the Import Theme page, in the Import from your computer section, click on Add file for selecting the Prestashop theme zip file you had.

Step 5: Choose Save button.
Step 6: Select the newly installed theme as your default theme, and Save.
Step 7: Configure the Modules to Install with the theme. Click on the section “Select the theme’s modules you want to install”. Hit Save button.
Step 8: Click on Go to the thumbnails regeneration page to generate images to fit the new theme.
Step 9: Use the default settings (or you can change the settings as you wish). Click on Regenerate thumbnails button.
For detailed illustration, you can see the Tutorial Video for this installation method in here.
b. Installing Prestashop theme through FileZilla (FTP client):

After getting hold of the pro version Prestashop theme zip file, you can install it as below.
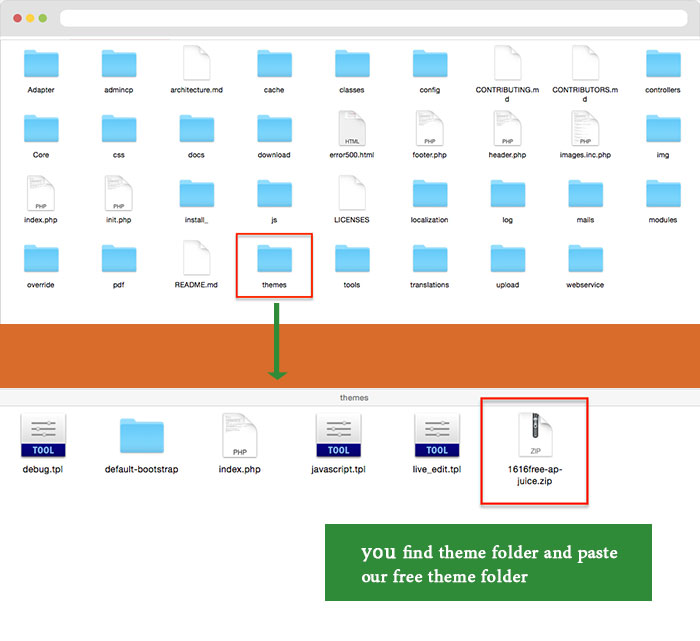
Step 1: Access your hosting using FileZilla.
Step 2: Find your theme folder, and paste such theme zip file.

Step 3: Access your Prestashop site backend. On the left menu, click on Preferences > Themes
Step 4: Hit Add new theme button
Step 5: At the Import Theme page, in the Import from FTP section, select the file you uploaded and click Save.
Step 6: Select the newly added theme as your default theme, press Save button. DONE.
IV. PRO VERSION PRESTASHOP QUICKSTART PACKAGE INSTALLATION:
Step 1: Unzip the Quickstart file you received from Apollotheme after purchase. Begin the installation.
Step 2: In the Installation Assistant window, select language for your site. Click Next.
Step 3: Accept terms & conditions, hit Next.
Step 4: Add information about your Store and your Account. Then, click Next.
Step 5: Access your database panel ( phpMyAdmin ) > Database > Add database name in the section Create database > Create.
Step 6: Return to the Installation Assistant window, in the System Configuration section, paste database name and change database prefix if you want.
Step 7: Click on Test your database connection now button to check the correctness of database configuration. After database configuration is connected, hit Next.
Step 8: Store installation takes place for several minutes.
Step 9: Once the installation is successful:
+ delete the install folder to finish or
+ rename the install folder for the effective working of the theme. For instance, we made change through adding the mark _ right to the end of the word install.
+ for the admin folder, it is required to change the name of this folder into admincp for easier back-end management. If not do so, there’s a series of characters as below, causing difficulties in managing your backend.
For example:
-If you don’t rename the admin folder, you’ll get the backend link as follows:
http://localhost/prestashop-defaul/admin047m8fnek/index.php?controller=AdminLogin&token=adc63398b923a17ca8808a4039919b87
-After renaming the admin folder into the admincp folder, you’ll get the following backend link:
http://localhost/prestashop-defaul/admincp
Step 10: Just see your front page.
For detailed illustration, you can see the Tutorial Video here.
V. APOLLOTHEME’S SUPPORT CHANNELS
If there’re any issues arising out of downloading, installing or using Pro version Prestashop Themes from Apollotheme, please feel free to contact us via support channels as follows:
+ Email address: apollotheme@gmail.com
+ Live chat box at the website (at the right bottom)
+ Skype: apollothemeservice1
We’ll get back to you within 24 hours. For weekends or holidays, it may take a bit longer, however, we’ll try our best to reply to you as soon as possible.
VI. CUSTOM WORK
In the event where you’re in need of doing relevant custom work for such themes, we, Apollotheme, also provide a wide choice of custom work service packages for customers. For further details, please see here.


Simply desire to say your article is as amazing. The clarity in your post is simply great and i can assume you’re an expert on this subject. Well with your permission allow me to grab your RSS feed to keep updated with forthcoming post. Thanks a million and please carry on the gratifying work.